How to Prime a Coil: A Clear and Confident Guide
When it comes to vaping, priming a coil is an essential step to ensure a smooth and enjoyable experience. Priming a coil refers to the process of saturating the cotton inside the coil with e-liquid before using it. This process helps to prevent dry hits and burnt taste, which can be unpleasant and ruin your vaping experience.
Understanding the importance of priming a coil is crucial for all vapers, whether you are a beginner or an experienced vaper. Failing to prime a coil can lead to various issues, such as a burnt taste, a shorter lifespan of your coil, and even damage to your device. Therefore, it is essential to know how to prime your coil correctly to avoid these issues.
In this article, we will guide you through the steps to prime a coil correctly and provide some tips for a better coil priming experience. Whether you are using a sub-ohm tank or a rebuildable coil, our guide will help you to prime your vape coil like a pro and enjoy a satisfying vaping experience.
Contents
Key Takeaways
- Priming a coil is an essential step to ensure a smooth and enjoyable vaping experience.
- Failing to prime a coil can lead to various issues, such as a burnt taste, a shorter lifespan of your coil, and even damage to your device.
- Following the correct steps to prime your coil and using some tips can help you to avoid these issues and enjoy a better vaping experience.
Understanding the Importance of Priming a Coil
The Role of a Coil in Vaping
A vape coil is a vital component of a vaping device. It is responsible for heating up the e-liquid and turning it into vapour. A coil is made up of a heating element surrounded by a wicking material, usually cotton. The wicking material absorbs the e-liquid, which is then heated by the coil to produce vapour.
Why Priming Matters
Priming a coil is an essential step in the process of setting up a vaping device. It involves saturating the wick with e-liquid before using it. This process ensures that the wick is fully soaked, which helps to prevent the coil from burning out.
If the wick is not fully saturated, the coil will not be able to vaporize the e-liquid effectively, resulting in a poor vaping experience. It can also lead to a burnt taste or a dry hit, which is unpleasant and can be harmful.
The Consequences of Not Priming
If a coil is not primed correctly, it can result in a burnt taste or a dry hit. A burnt taste occurs when the coil burns the wicking material instead of vaporizing the e-liquid. This can happen if the wick is not fully saturated with e-liquid.
A dry hit occurs when the wick is not saturated with e-liquid, and the coil heats up the wick instead of vaporizing the e-liquid. This can be harmful and unpleasant, as it can cause irritation to the throat and lungs.
In summary, priming a coil is an essential step in setting up a vaping device. It ensures that the wick is fully saturated with e-liquid, which helps to prevent the coil from burning out and having to replace the coil earlier than necessary.
Steps to Prime a Coil
When replacing a coil in a vaping device, it is critical to prime the new coil before use. This process involves saturating the wicking material with e-liquid to prevent dry hits and ensure optimal flavour. In this section, we will outline the steps to prime a coil for a satisfying vaping experience.
Preparation of the New Coil
Before priming a new coil, it is essential to prepare the vaping device. Begin by disassembling the tank and removing the old coil. Next, clean the tank thoroughly to remove any residual e-liquid. Once the tank is clean, it is time to prepare the new coil.
To prepare the new coil, inspect it for any damage or defects. Then, ensure that the wicking material is properly aligned and not loose. Finally, add a few drops of e-liquid to the top of the coil to begin the priming process.
The Priming Process
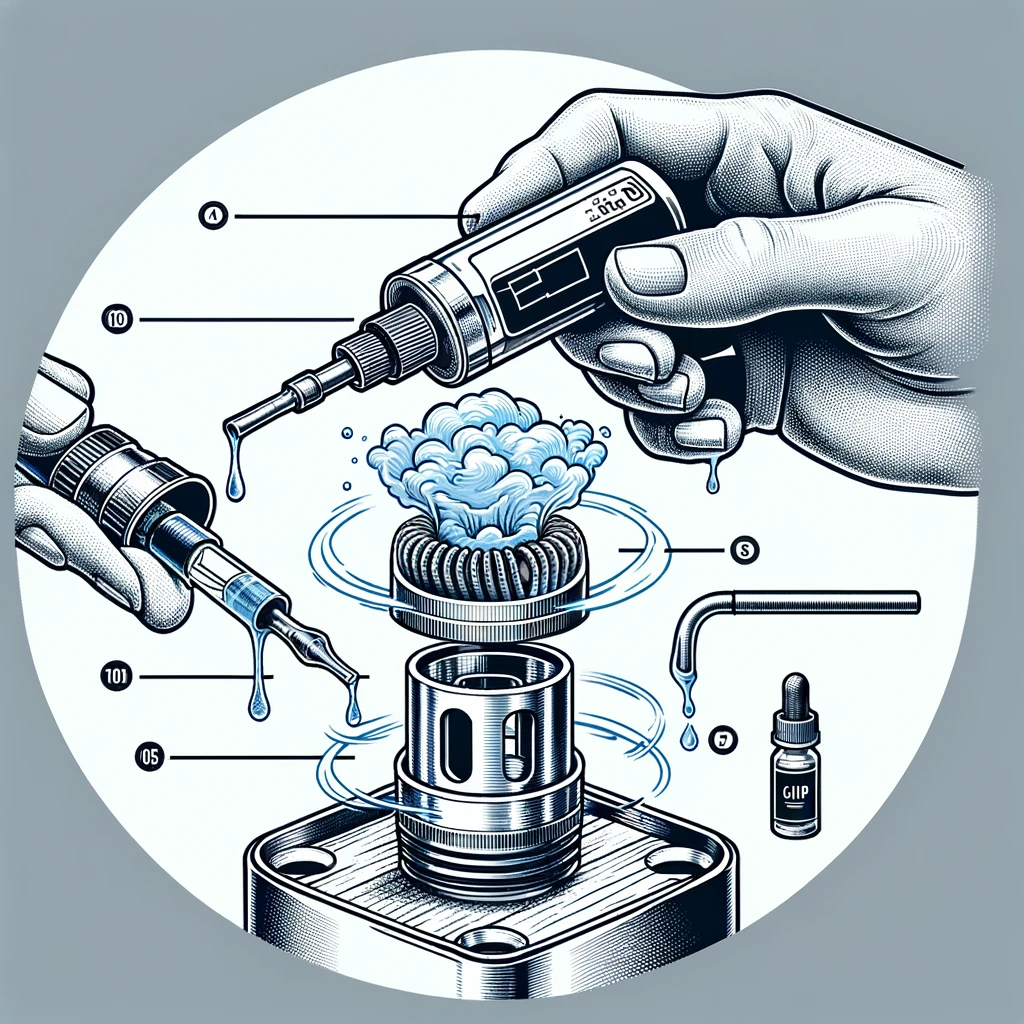
The priming process involves saturating the wicking material with e-liquid to ensure that it can effectively vaporise the e-liquid without burning. To prime the coil, follow these steps:
- Apply a few drops of e-liquid to each of the wicking holes on the coil.
- Wait for a few minutes to allow the e-liquid to fully saturate the wicking material.
- Apply a few more drops of e-liquid to the top of the coil.
- Take a few priming puffs without pressing the fire button to draw e-liquid into the coil.
Installation and Testing
Once the coil is primed, it is time to install it in the vaping device. Begin by screwing the coil into the base of the tank. Then, reassemble the tank and fill it with e-liquid. Allow the tank to sit for a few minutes to ensure that the e-liquid fully saturates the wicking material.
Before vaping, it is essential to test the coil to ensure that it is working correctly. Begin by taking a few short inhales to allow the e-liquid to fully saturate the wicking material. Then, gradually increase the wattage or temperature until you reach your desired vaping experience. If the flavour is not optimal, repeat the priming process to ensure that the wicking material is fully saturated with e-liquid.
By following these steps, you can effectively prime a new coil for a satisfying vaping experience. Remember to take your time and ensure that the wicking material is fully saturated with e-liquid before vaping to prevent dry hits and ensure optimal flavour.
Tips for a Better Coil Priming Experience
Coil priming is a crucial step in ensuring a smooth and flavourful vaping experience. Here are some tips to help you get the most out of your coil priming process.
Choosing the Right Coil
When choosing a coil, it is important to consider the resistance and type of coil you need. Sub-ohm coils are designed for high-wattage vaping and produce more vapour. Mesh coils, on the other hand, are known for their superior flavour production. Make sure to choose a coil that is compatible with your device and e-liquid.
Optimising E-Liquid Use
One of the most important aspects of coil priming is ensuring that the wick is thoroughly saturated with e-liquid. Use a high-quality vape juice with the right viscosity for your coil. A thicker e-liquid may take longer to saturate the wick, while a thinner e-liquid may flood the coil, causing gurgling and popping sounds.
Avoiding Common Mistakes
Dry hits and burnt tastes are common problems that can occur when a coil is not primed correctly. To avoid these issues, make sure to saturate the wick with e-liquid before vaping. Overpriming, however, can cause flooding and leakage. Take care to use the right amount of e-liquid to avoid these issues.
In conclusion, coil priming is an essential step in ensuring a smooth and flavourful vaping experience. By choosing the right coil, optimising e-liquid use, and avoiding common mistakes, you can get the most out of your coil priming process.
Final Thoughts
In conclusion, priming a coil is a crucial step for achieving an optimal vaping experience. Properly priming a coil helps to prevent dry hits, increases coil longevity and maximises device performance.
When it comes to priming a vape coil, there are several methods to choose from. The most common method is to drip a few drops of e-liquid onto the exposed cotton wick before installing the coil. This ensures that the cotton is fully saturated with e-liquid, preventing it from burning out when the device is fired.
It is important to note that different coils require different amounts of priming. For instance, sub-ohm coils require more e-liquid than regular coils due to their larger size and lower resistance. Therefore, it is crucial to read the manufacturer’s instructions and follow them accordingly.
Additionally, it is recommended to wait a few minutes after priming the coil before vaping. This allows the e-liquid to fully soak into the cotton wick, ensuring a smooth and flavorful vaping experience.
Overall, priming a coil is a simple yet essential step for any vaper. By following the proper priming techniques, vapers can enjoy a longer-lasting coil and a more enjoyable vaping experience.
Frequently Asked Questions:
How do I properly prime a new vape coil?
What is the best way to break in a new coil?
How long should I let my vape coil soak before using it?
How do I fix a flooded coil?
Can I change my vape coil with juice still in the tank?
Leave a Reply